Battery Port Tester Instructions:

How to connect the battery plug to your new Battery Port Tester.
Introduction:
The Battery Port Tester (BPT) is a useful tool when repairing a Mac motherboard. It will show you if the circuitry for the charging is working. On the one side this is the ISL that makes the PPBus_G3H line where the whole Mac runs off and that is used to charge the battery. On the other side is the SMC controlling the ISL. In between there is the I2C bus that the SMC uses to talk to the ISL and the battery.
There are two ways to use the Battery Port Tester.
1) You power the Mac from Magsafe. The BPT will use the charging voltage to run off. As long as the Mac is charging the 'battery' the BPT will work.
2) You connect the BPT to a DC power supply. The BPT will now pretend to be a full battery and the Mac can run off the 'battery'. If PPBus_G3H is not made in a Mac then you can use this to see if the Mac itself is still working.
Either way the BPT pretends to be a 'good' battery. It is much easier (and safer) to connect a BPT to a motherboard you are working on than a real battery. Because the BPT is pretending to be a 'good' battery the Mac will run at full speed and the Mac will turn on in the case of those models that do not even want to turn on with no battery connected. All Macs from 2011 onwards run at about 1/4 speed when there is no (good) battery connected. This must be Apple's way of encouraging the poor user to go and buy a new computer...
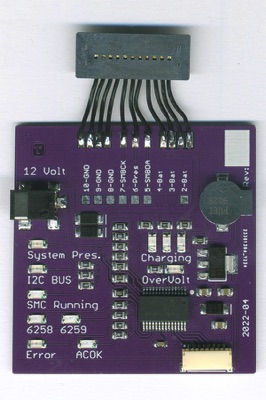
The functions of the LEDs:
LED System Pres. (Red) - System Presence. If there is a problem with the System Presence resistor in the Mac then this LED will light up.
LED I2C BUS (Red) - This LED will blink if there is a problem with the I2C bus. The BPT checks for shorts and checks if the line is being pulled high by the Mac. This is done for both the Data and the Clock line.
1 blink = Clock line is not pulled high (no 3v42 in Mac)
2 blinks = Data line is not pulled high (no 3v42 in Mac)
3 blinks = Clock line is not connected to anything
4 blinks = Data line is not connected to anything
5 blinks = Clock line is stuck High
6 blinks = Data line is stuck High
LED SMC (Blue) - This LED will blink if the SMC (System Management Controller) is communicating on the I2C bus.
LED ISL 6258 6259 (Green) - These LEDs light up if either a ISL6258 or ISL6259 is seen on the I2C bus.
LED Error (Red) - Error with the I2C bus
LED ACOK (Green) - this LED lights up if the ACOK line is high. I.e. the ISL is telling the SMC that a Magsafe charger is connected.
LED OverVolt (Red) - This LED lights up if the battery voltage is much higher than it should be. If you have a DC power supply connected then it is set to a too high voltage. If the Mac is running off Magsafe then something is very wrong with the charging circuit.
LED PMIC (Green) - This LED lights up if the PMIC chip is seen on the I2C bus and the BPT is able to talk to it. This LED is only present on the BPT for those models that have a PMIC.
Connecting the Battery plug:
The Battery Port Tester ships without the battery connector. This is because, so far, we have not been able to source those plugs in any quantity.
If you know where we can buy any of the Apple battery plug models then please tell us.
Almost all models of the Battery Port Tester have IDC (insulation displacement) connectors. All you have to do is harvest the correct kind of connector from an old, dead battery of the correct model. Insert the wires into the IDC connectors and press the IDC connectors shut with pliers, being careful not to damage the connectors. The process is shown in the movie below:
Soldering the Battery plug in the A4596 (Retina 15"):
For the A4596, which matches the MacBook Pro Retina 15-Inch models you have to solder the connector to the PCB. The wires on the connectors in the original batteries are so short that the IDC connectors would not be feasible. The best is to solder the wires of the connector out of the old-battery-PCB. This so that the wires are as long as possible. Then solder the wires to the Battery Port Tester PCB carefully and in the correct order. The photos below show the 'before' and 'after'.

Using the 'Known Good Battery' with the Medusa:
You can connect the KGB to a CMIzapper Medusa using one of the cables supplied with the Medusa to connect Port-A to the little white JST plug on the KGB.
On those models that connect to a Unibody Mac, one of the screens on the Medusa will display if the KGB detects the BIL (Battery Indicator Light) in the Mac. The Known Good Battery will turn on all the lights of the BIL if it detects a BIL to conform to you that the BIL is working. If the KGB is complaing about the I2C bus not working then try disconnecting the BIL from the motherboard. Corrosion on the BIL will often mess up the I2C communication for the rest of the Mac.